
Guide to Audio Cable
- getintocinema

- Oct 12, 2019
- 9 min read
One of the key things you will have to get to grips with in your recording are the various audio cable types. Audio cables are the necessary thing you need to connect up all your recording gear and interface. In this post, the main focus is on analog audio cables (XLR, TRS, TS and RCA). But you will also find out about 3 very common digital audio cables too (MIDI, USB and Thunderbolt cables).
I. Analog vs Digital
What’s the difference between analog and digital audio cables? Analog cables work by transmitting information through a stream of electricity, and digital cables work by transmitting information through a long string of 1’s and 0’s (aka binary code).
In a home recording studio situation, you are mostly concerned with how to transmit the analog sound from your mics and instruments so that you can eventually capture the sound in your DAW or other recording app or software. So, that is the key focus of this post.
Understanding Analog Connections
Your goal is to record a clean and loud enough signal from your microphone, guitar, keyboard, synth, or drum machine in your recording software or DAW. Recording success has a lot to do with the audio cable types you choose. Get the audio connections right, and your audio recordings will sound good. So, how do you decide which is the right audio cable?
As a general rule, you read what it says on your gear, or refer to the manual. Sounds simple? Well, let’s start with an in-depth look at the most common audio cable types. Then we’ll examine the inputs and outputs on some popular home recording studio gear to see how it all fits together. You’ll soon get the hang of it.
The 1/4-inch (6.35mm) Analog Plug Connector
The 1/4-inch (or 6.35mm) jack plug is the most common audio connector, and the most versatile. An audio lead with a 1/4 inch plug is also known as a jack lead. But not all jack leads are the same! Here’s a bit more detail on what you really need to know.
1. Mono/TS Cable (Tip-Sleeve) 6.35mm (1/4″)
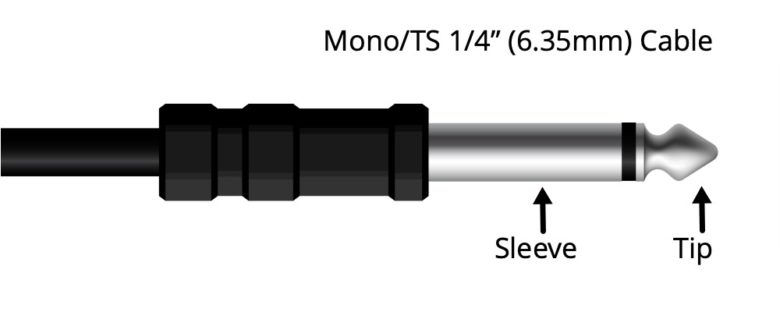
This the audio cable or cord you use for your guitar, or for the left and right outputs of a synth or keyboard (assuming outputs are not balanced). It is mono because you only have one channel through which to send the signal. Either left or right. You cannot send a stereo signal through this audio cable.
The most common TS cords are instrument cables. The instrument cable contains one wire and a shield. The wire is connected to the tip, the shield is connected to the sleeve. You need the shield to minimize noise.
Instrument cords, or jack cables, are unbalanced because of the way they are wired. The signal is sent through one wire. The shield is used for the ground. (ie it keeps the noise down). More on balanced vs unbalanced later …
Meanwhile, here is one more thing you need to know. If you are connecting instruments, for instance, a guitar, a keyboard or a synth, then make sure you purchase an instrument cable. NEVER use a speaker cable to connect instruments.
Most TS cables on sale are low-noise instrument cables. Just double-check before you buy. However, if you are connecting from your amplifier to a speaker or monitor, then do make sure you use a speaker cord. The connections look the same, but the signals are different strengths.
2. Stereo/TRS Cable (Tip-Ring-Sleeve) 6.35mm (1/4″)

The stereo TRS cable looks almost identical to the TS cable, but this 1/4″ jack plug has 3 contact points (the Tip, Ring and Sleeve) separated by 2 plastic dividers. Spot the difference?
The TRS cable can be used in 2 different ways:
As a stereo cord, where the signal is split into the right channel and the left channel. Generally the left-channel signal is attached to the tip, the right-channel signal is connected to the ring. Finally the shield is wired to the sleeve.
As a balanced mono cable to connect professional audio gear. For example, to connect a synth with balanced outputs to an audio interface with balanced TRS inputs. The benefit of a balanced cable is you can have a long cable run without creating noise. How will you know whether the outputs on your gear are balance or unbalanced? Your outputs will almost certainly be labelled if they are balanced … or refer to the manual for your equipment to be sure.
XLR Mic Cables

The XLR connector is used for microphones and also some line connections between professional gear. This cable has a female and a male end. The XLR cable is wired much like a TRS connector and is balanced to minimize noise. The XLR mic cable is also sometimes called a low Z cable because it carries a low-impedance signal.
XLR cables can be very long without noise interference, because again they are balanced.
RCA Phono Cables

RCA cables, sometimes referred to as phono plugs, or phone cables, are common on home stereos and a lot of semi-pro audio gear. They function very much like TS cables, with one connector and one ground. The RCA cable is an unbalanced cable. RCA connectors usually come in pairs to achieve stereo. Most of the time the red is used for the right channel (easy to remember: red-right) and white is used for the left channel.
Keep your RCA cables is short as possible, else you might pick up noise and electrical hums.
The 1/8-inch (3.5mm) Analog Plug Connector
For completeness, you may have outputs and/or inputs that are a smaller size, to fit a 3.5mm (1/8-inch) jack plug. So let’s examine the two mini jacks you will frequently encounter.
Stereo/TRS Cable (Tip-Ring-Sleeve) 3.5mm (1/8″)

The 1/8″ mini jack plug is a tip-ring-sleeve (TRS) plug, like its larger 1/4″ brother.You will find the 1/8-inch (or 3.5mm) TRS plug on many, if not most, consumer headphones. In fact if you purchase pro-audio headphones you will often find they have a 3.5mm jack with a 1/4″ (6.35mm) adaptor as shown below. For example, the Sony MDR7506 Professional Heaphones have this arrangement.

You may also find some of your audio equipment has a 3.5mm aux output or input. In that case, you will need an audio cable with a 3.5mm TRS jack plug. The aux out will usually be a stereo output. The aux output is unbalanced.
To connect your aux output to twin mono 6.35mm inputs on an interface you will need a Y-Cable (aka breakout cable) like the Hosa CMP-159 below. This takes the stereo signal picked up through the 3.5mm plug and splits it into left and right dual mono 1/4″ TS.

TRRS (Tip-Ring-Ring-Sleeve) 3.5mm (1/8″) Headphone and Mic Plug

You will mostly find the four-conductor tip-ring-ring-sleeve (TRRS) in use on tablets, smartphones, and laptops. Note how there is an additional ring on these jack plugs. The extra ring provides an additional audio channel. The TRRS combines microphone input, as well as stereo heaphone output. (If you use the appropriate equipment).
Nearly always, a TRS 3.5mm headphone plug will work in a TRRS socket, so you can listen to the audio output. But if you have the additional ring on the plug, and a mic on your headphones, then you can use your headphones like a headset. The upshot of this kind of port is if you want to record on your phone, laptop or tablet without an interface, you can do so if you have a mic with a TRRS plug, like the Rode Smartlav+ or similar.
2. Digital Cables
You will find more and more digital cables in a modern home recording studio. In some ways, digital cables are more straightforward. This is because unlike analog cables, with digital cables you don’t really need to understand much about how they work, in order to use them. You simply purchase the correct cable according to the protocol: ADAT; S/PDIF (also known as TOSLINK); BNC; and AES/EBU.
To keep this post simple, we are concentrating on analog cables and only 3 most common digital cables found in a home recording studio situation. If you have an audio interface or pro audio gear with digital connections, then refer to the manuals of the devices so you purchase the correct interconnect. You will also find useful information in our post on recording digital audio.
MIDI Cables

MIDI cables are used to sync and communicate instructions between MIDI compatible gear. So, your digital piano or electronic drum kit will almost certainly have MIDI i/o. Many modern MIDI devices now use USB to connect. However, you may find it more efficient, even if USB is an option, to use the traditional MIDI ports on your equipment, and connect them with a MIDI cable.
The MIDI cable has 5 pins. You may see the MIDI cable referred to as a 5-pin DIN cable.
USB Cable

USB (Universal Serial Bus) is a common way to connect devices in a home recording studio. The majority of audio interfaces connect via USB. As do many MIDI keyboard controllers. Digital pianos and music keyboards often have a ‘USB to Host’ connection for MIDI.
Most interfaces and keyboards connect via the USB B to A as shown above. (It’s a standard USB printer cable). However, many USB mics and some interfaces have a mini USB port. Often you will get a USB cable in with the audio device, but if not it is a simple matter of checking the connections and ordering the correct cable.
USB has different standards, as follows:
USB 1.1: this original standard can handle a data rate of up to 12 Mbps (megabits per second)
USB 2.0: Also called High-Speed USB. This can handle 40 times the data flow of the older standard. 480 Mbps
USB 3.0: Also referred to as SuperSpeed USB. This connection transfers data at 5 Gbps, ten times faster than USB 2.0
As there is more than one standard, do check the ports on your computer and your interface or device, so that you purchase the correct speed of cable.
Incidentally, a MIDI interface is not just a connection cable. It has MIDI connectors on one end, a USB connector on the other, and an interface between the two to allow the communication between the MIDI instrument and the MIDI software, via a USB port.
Thunderbolt

There are increasing numbers of high-end interfaces which connect via Thunderbolt. For example, the Focusrite Clarett Thunderbolt Interfaces. Thunderbolt offers unprecedented data transfer rates, previously only seen on dedicated PCIe processing cards.
However, before you get too excited, it’s important to check which protocol your computer’s ports support before purchasing peripherals (such as an audio interface) to ensure correct compatibility. For example, the 2016 Apple ‘MacBook Pro’ models each feature Thunderbolt 3 ports as the only method of device connectivity. The 2015 Apple ‘MacBook Pro’ features Thunderbolt 2. Conversely, the 205 Macbook (not Macbook Pro) features USB 3.1 as the only method of device connectivity, though the ports appear to be identical.
In general, you should assume that any ‘Type C’ ports on any computer are USB 3.1 only unless the Thunderbolt logo appears next to them, or the manufacturer states it is Thunderbolt.
Thunderbolt 3 is a new connectivity standard from Intel that replaces Thunderbolt 2. The Thunderbolt 3 port provides a theoretical maximum throughput of 40 Gbps, which is double the speed of the previous standard. It is also is symmetrical and reversible. As a result, you no longer have to worry about whether or not a connector is right side up or upside down before plugging a cable into the notebook.
It is easy for you to confuse the difference between Thunderbolt 3 and USB-C. No doubt this at least partially is because the ports look identical apart from the “traditional” three prong USB logo on USB-C cables and the “Lightning Bolt” logo on Thunderbolt 3 cables.
The simplest explanation is that USB-C refers to the shape of the port and Thunderbolt 3 refers to the connectivity standard. Thunderbolt 3 combines Thunderbolt, USB, DisplayPort and power via a single USB-C connector.
So, you connect a Thunderbolt 3 device to a “Touch Bar” MacBook Pro using the Thunderbolt 3 standard via a USB-C shaped port. Hardware commonly referred to as “USB-C devices” also will work with a Thunderbolt 3 port, but they will not be able to take advantage of the maximum speed provided by Thunderbolt 3 devices.
There are many type of digital audio cable that we are not mention in lesson such as HDMI Cable, Firewire Cable...
The Inputs and Outputs of a Typical Audio Interface
Now that you have covered all the main audio cable types found in a typical home recording studio, let’s look at two popular products to see which cables you might require. First, take a close look at the Focusrite 2i4 USB Audio Interface.
This interface can accomodate nearly all the audio cable types referred to in the above post! Here is an annotated picture of the front and rear panel. It shows you all the different input and output ports.

Front panel: As you can see, the interface has balanced inputs on the front. You can connect microphones via XLR cables (a balanced signal). You can connect balanced line level signals using TRS 6.35mm jacks cables. Or, you can record guitars or other unbalanced line or instrument level devices via 1/4″ TS cords.
The headphone output requires a 1/4-inch TRS stereo jack.
Rear panel: This audio interface has MIDI ports for MIDI in and MIDI out. There are two sets of unbalanced outputs, left and right. These are of the RCA phono type.
There are also two balanced line outputs. These require TRS 6.35mm cables to connect to either an amplifier or powered monitors. (See below). Finally, as you can see, this is a USB interface, so there is a USB output to connect the device to a computer.
The Inputs of a Typical Home Recording Studio Powered Monitor
Among the most popular home recording studio monitors are the KRK Rokit 5 Powered Speakers. Here is a view of the rear of one of these monitors. Again, annotated so you can see the choice of inputs. (nb this is a rear view of the older version of the KRK Rokit 5 Monitors – but it does show different kind of audio inputs in action). The KRK Rokit 5’s are now available in a newer version, with upgraded features.

As you can see above, you could either use a pair of RCA phono cables to connect the unbalanced RCA outputs on your audio interface to the unbalanced RCA inputs on the Rokit Monitors.
Or, better, you could use TRS 1/4-inch jack cables to connect the balanced outputs on the interface to the balanced inputs on the monitors.
Finally, you could use a pair of TRS to XLR cables which would again make a balanced connection from the interface to the monitors.


Comments