
Color Correction Workflow in Premiere CC
- getintocinema

- Aug 4, 2019
- 4 min read
Now that we’ve gotten to know the tools a bit, let’s take look at how you should attack a color-grading session. This common workflow makes grading faster, simply by minimizing the number of times you need to re-adjust any parameters.
1. Grading RAW? Adjust the Source Settings First
Source Settings for all RAW formats are found in the Effect Controls panel under the Master tab. The settings available for the different formats vary a lot, from the incredibly detailed settings for RED RAW to the very limited settings for Sony RAW.
If your footage is not RAW, you can jump straight to the next section and find your hero shot.

The idea of Source Settings is to get the levels within a workable range and somewhat normal-looking before you start the actual grading. Adjustments you do in the Source Settings are not adding to the CPU or GPU load, and you’re using the full bit depth of the file.
You can also apply source settings to multiple selected clips in the Project panel. Select the clips and right-click and choose Source Settings or click Clip > Source Settings.

If Source Settings is grayed out, you must select Disable Masterclip Effects in the right-click menu to make the Source Settings option available.
2. Find a hero shot, and correct it
The hero shot is the shot that you will match the other ones to. It isn’t necessarily the best shot. You will never be able to make a very bad shot look like the best shot, but you may be able to match both to a shot that’s somewhere in between, so choose a hero shot that’s similar to as many other shots in your scene as possible. Then:
Set the black levels while watching your RGB Parade scope. If necessary, adjust the RGB balance to make them neutral. My favorite tool for this is the RGB Curves.
Set the white levels the same way.
Set the gamma, meaning you’ll adjust shadows, highlights and midtones. This is mostly done by eye, although you may want to get skin tones in the right range etc.
Tweak memory colors like skin tone, foliage and grass, sky, etc. with secondaries.
Use secondaries and masks to adjust important colors on logos, props, costumes etc.
3. Match Shots
When the hero shot is done, you can start matching the other shots to it in Comparison View. You can do this manually or use the Match feature in Lumetri Color panel.
4. Add A Creative Look
When the shots are all looking good, it’s time for adding that creative look. I prefer to use an Adjustment layer for this, placing it on a track above all the clips. It may be necessary to do individual tweaks to some clips after adding the adjustment layer.
5. Keep levels legal with the Video Limiter
If you’re delivering to broadcast, streaming services or cinema, you’ll have to keep your video levels within legal range. But even if you’re outputting to YouTube or other places on the internet, or a file to be played locally on a computer, you should keep your levels within certain limits. Levels above 100 IRE will generally not show on a computer monitor and will just show as white.
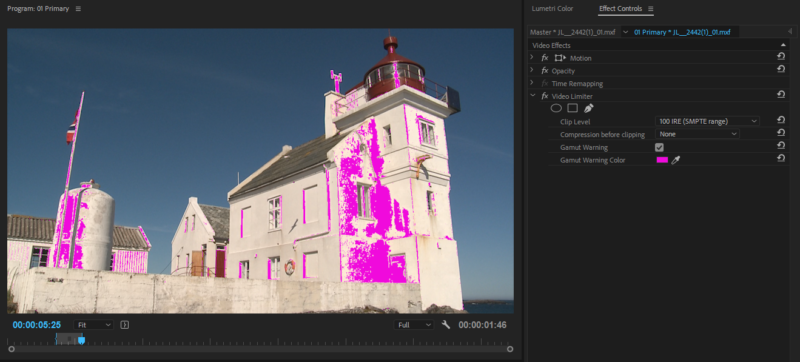
To make sure your levels are within range, add an adjustment layer above everything else and apply the Video Limiter effect to it. The new Video Limiter effect we got in version 12.1 is much better than the old one and also has a gamut warning feature. It includes a small range of meaningful presets, combined with good image processing under the hood.

By default, the Video Limiter will just clip the whites and cut the saturation at the levels dictated by the Clip Level settings. Use this as a safety net after grading.
Do not rely on this effect to take care of your levels. You’ll get much better results if you grade your clips properly, getting them within range, and then add the Video Limiter to take care of any small mistakes you’ve made. Just so you don’t get the project kicked back from the broadcaster.

I chose the EBU preset, since I’m based in Europe. If you turn on the Gamut Warning, you can see what pixels the Video Limiter has affected. Now that you know that the levels are out of gamut, you can grade the clip to make it adhere to the standards.


If the clipping is a bit harsh, you can tell the Video Limiter effect to compress the highlights before clipping. I generally don’t use this option, as I like to get my shots legal by manual tweaking.

The higher you set the compression, the more of the image will be compressed.

When you use Compression before clipping, the color overlay shows what parts of the image has been compressed and clipped to get them into legal range. Not all of the colored sections are too bright, but the limiter is reaching back into the almost-too-bright range in order make the transition smooth.
I use the Video Limiter set to clip at 100 IRE and turn on the Gamut Warning when I grade video that will be watched on a computer or on YouTube or other social media. Since levels above 100 IRE will be clipped on most computer monitors, I like to know what pixels they will not see and make manual adjustments, so they get within visual range.
As you’ve seen, the Video Limiter is a great tool for colorists. Do remember to switch the Gamut Warning off before you export, though—it will show on your exported video!
Use Masks with Lumetri
While Resolve uses the fancy term “Power Window”, in Premiere Pro it’s just a Mask—a method for targeting your effects to an isolated part of the image. The way they’re used is the same. There’s no Masks section inside the Lumetri panel, but that doesn’t mean we can’t use masks. In the Effect Controls panel, you can create an ellipse, rectangle, and free-draw Bezier masks as on any other effect.
In my shot, I didn’t want the yellow objects to the right to be affected by the adjustment I did to change the yellow color of the house. So, I clicked the Pen icon under the name of the effect in the Effect Controls panel and drew a mask around the house.

Now only the pixels inside the mask are affected. I could also have made a mask around the other yellow objects and inverted the mask by checking the Inverted box.


Comments