
The Complete Guide to Premiere Pro Color Correction
- getintocinema

- Aug 4, 2019
- 8 min read
The mark of every great editor is a full understanding of the tools at their disposal—and the ability to use those tools to their full potential. And few tools are as important and nuanced as those that affect color grading. If you’re a Premiere Pro editor, today I’m going to give you a decidedly comprehensive deep dive into Premiere’s Lumetri Color Panel. Prepare to take a few more steps toward greatness!
The Lumetri Color Panel is found in After Effects and Premiere Pro. To use its tools to the max, we’ll dive into the hidden secrets and lesser-known corners of the panel. We’ll work on a wide range of problematic footage, using advanced techniques. I’m assuming you have at least a basic understanding of color correction concepts and terminology, and know your way around scopes. If you don’t, you might want to read up on color correction basics, as well as how to read scopes. The knowledge you get in this article will make you a color grading ninja without ever leaving Premiere/AE.
How Lumetri Works
Let’s start with an overview of the Lumetri Color Panel itself. If you’ve been using the panel for a while and know how the controls work, you might want to skip directly to some of the other sections, linked above.
The Lumetri Color Panel Is A Remote Control
Think of the Lumetri Color panel as a remote control for the Lumetri Color effect. Whatever you adjust in the panel affects the corresponding settings in the Lumetri Color effect. You could do the exact same adjustments in the Effect Controls panel, but the controls in the Lumetri Color panel are much easier to adjust, and they’re always available in the same place.

The Lumetri Color panel (and the effect itself in the Effect Controls panel) is divided into six main sections with somewhat overlapping functionality. So, whatever image processing or video editing software you’re coming from, you should be comfortable working in at least one of them. We’ll take a closer look at each one.

The Basic Correction Section
This first section of the panel is based on the well-known (at least for still photographers) panels in Lightroom and Adobe Camera RAW, so it’s easy to get started. This is where most people work when they do color grading.
Most of the sliders are pretty much self-explanatory, but a couple are worth specifically addressing.

Input LUT: This is where you add your technical LUT to get your footage into the Rec. 709 color space (more on technical LUTs below). If your footage is shot in Log or with some custom camera settings, you can add an Input LUT before you start adjusting the controls. This will make the image look “normal”, and the sliders will work as expected.
Note that the Input LUTs that you apply here are applied before all the sliders and other controls.
The HDR White slider is not active until you choose High Dynamic Range in the panel menu.
The White Balance Selector (the eyedropper) can help fix the white balance in a clip. Click it and then pick an area in the picture that’s supposed to be white. Ctrl/Cmd-click to sample the average of 5×5 pixels, instead of just clicking, which will sample just one pixel. This will give you a much better representation of the color, as there will always be small variations in the pixel values due to noise and compression artifacts. The eyedropper will get a little fatter when you press Ctrl (Cmd) to indicate that it will sample a larger area.

I often have trouble finding a perfectly neutral area in my footage, and I find that I get better results when I tweak the sliders manually. On some clips, mainly when you have some obviously white areas, it will work just fine.


Other times, the White Balance Selector will mess with the black levels, introducing a color cast in the shadows. As you’ve probably guessed by now, I don’t use the Auto White Balance Selector too often.
When manually tweaking the sliders for a white balance, adjust the Temperature slider first until you get the red and blue levels the same. Then, adjust the Tint slider until the green matches the two others. There’s a reason for the order they have in the UI.
Under the White Balance controls, you’ll find the Tone sliders. They should be very easy to understand. They control exactly what their names indicate. The HDR Specular slider is grayed out until you choose High Dynamic Range in the panel menu.

Please note that adjustments to the Whites and Blacks sliders are applied before the other sliders, even though they’re placed at the bottom of the stack in the UI. More on that in the Color Science section.
The Creative Section
The Look drop-down menu is where you can apply the LUTs that you put in your Creative folder (see below). You can choose a LUT from the drop-down menu, or browse them using the arrows pointing left and right, and then click the preview thumbnail to apply the LUT. If your favorite look is not in the list, click Browse and point to the folder where you keep it.
The preview you see in the thumbnail shows the LUT applied to the original footage, ignoring other adjustments you’ve done to it. So, what you see in the thumbnail isn’t necessarily what you get. This is confusing, and I don’t like the way it works.

The Faded Film raises the blacks and lowers the whites for a duller look. The Vibrance slider adjusts saturation, but avoiding the already saturated pixels and skin tones, to avoid over-saturated colors. I like to use the Vibrance slider to create a desaturated look. I think it does a better job for this than the standard Saturation slider.
Overall, I don’t use this section much. I mostly use it when I need to adjust the Vibrance or when I apply a look/LUT to an adjustment layer. This section is disabled when you set the panel to HDR.
The Curves Section
This is my favorite section! When I don’t have a control surface, I do most of my adjustments here. Combined with the RGB Parade scopes, the RGB Curves is a very intuitive way to do color grading.
In addition, the Hue Saturation Curves gives you independent control over the saturation of every color, making it very fast to adjust the greens in foliage or to add saturation to the sky to make it “pop.”

As with other controls in Lumetri, just double-click to reset the individual curves. Surprisingly you can’t reset all of them with one click since there’s no Reset button. There are Reset Parameter buttons for RGB Curves, Hue Saturation Curves and the whole Curves section in the Effect Controls panel, though.
The Color Wheels & Match Section
This section will probably be the most familiar one if you’ve done color grading in other NLEs. With the three-way color correction, you can adjust the brightness, hue, and saturation for shadows, midtones, and highlights independently.
This is also where you find the new Color Match feature and a button to toggle Comparison View on and off. All the adjustments from the Color Match feature are done in this section.
To adjust the shadows, drag the cross in the center towards the color tint you want—or away from the color you want to remove. To make the shadows darker, drag the slider down, and drag it up to make the shadows lighter. The controls for midtones and highlights work the same way.

The color wheels give you great feedback to show you what has been adjusted (by you or by the Color Match feature). The wheels get filled when they’ve been adjusted, and the sliders get blue. So, in the figure here, we can see that I’ve adjusted both the slider and the color wheel for shadows, only the color wheel for the midtones, and only the slider for highlights.
There’s a “gear” function at work in these wheels and sliders, so you must drag the crosshead a lot longer towards the desired color tint than the distance you want the slider or point to move. This makes accurate adjustments a breeze, even though the wheels are small on the screen. Press Shift while you’re dragging to make them move faster. You can also just click where you want the crosshair to be, and then drag it to tweak it further.
If you’re using a control surface, the wheels and knobs there will adjust the wheels and sliders in this section. A great thing about using a control surface is that you don’t need to activate the Lumetri Color panel. Just place the playhead over the clip and start adjusting.
Like in the Basic Correction section, the HDR White slider is inactive until you choose High Dynamic Range in the panel menu.
The HSL Secondaries Section
This section lets you create interesting looks, make your viewers focus on the right parts of the image, and so on. You can select pixels within a selected range of hue, saturation, and lightness and adjust only those pixels. You’re actually making a mask that is defined by a color key, if that helps you understand what is going on—if not, don’t worry. I’ll explain further.
This where you can fix a skin tone after adding a teal tint, make a dress or a logo stand out from the rest of the image, and so on. You can also hit the Invert Mask button to invert the selection and adjust all other pixels instead, preserving the selected ones as they are.
Let’s make the yellow color of the house in this shot pop a bit more.

To do the initial section you can click one of the colored buttons or use the left eye dropper. Then you can use the plus and minus eye droppers to add and remove pixels from the section.

Like with the White Balance eyedropper, you can press Ctrl (Cmd) to get a bigger eye dropper that samples the average of 5×5 pixels.
To see what pixels are selected you can choose to see white/black, color/black or color/gray. What mask view that best shows your selected pixels will depend on the footage. In my case, the yellow color showed up best against black.

After you’ve picked the colors you want to change with the eyedroppers, you can adjust the sliders (Hue, Saturation and Levels) to select a wider or narrower range of pixel values. You drag the triangle on top of each slider to adjust the range, and the bottom triangle to make the transition between selected and non-selected pixels smoother.
Use the Denoise slider to get rid of any small specks in the key mask. You can also drag the Blur slider a tiny bit to soften the mask if the edges get a bit harsh. Watch the mask view closely while dragging the sliders.


HSL Secondaries Issue
Instead of doing the key on the original footage, the HSL Secondaries key in Lumetri is looking at the pixels after the sections above it. So, if you tweak the color in the sections above the HSL Secondaries in the same Lumetri effect, or on the Master Clip, the HSL keys are affected.
If you decide to increase the exposure or cool down the clip after you’ve adjusted the key, all the HSL keying must be done again.
In my opinion, HSL keying should be done pre-effects—at the very latest immediately after the Input LUT. Changing the color, sharpness, and so on should not affect the key and should always work based on the original pixels.
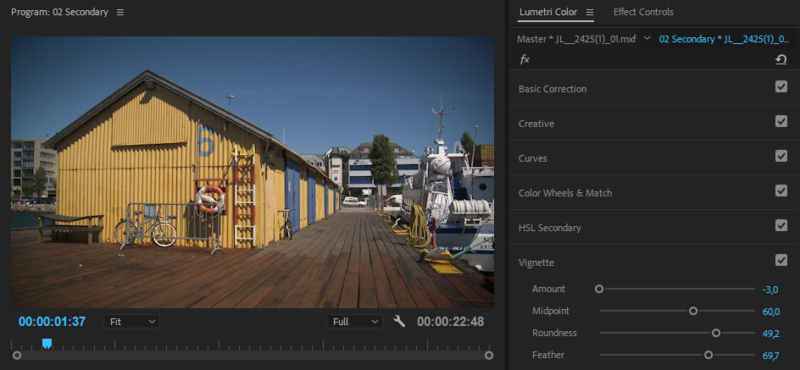
The Vignette Section
In the Vignette section you’ll find sliders for the amount of darkness or lightness the vignette should have, the midpoint, the roundness and the feathering.
Although I do sometimes use vignettes, I don’t use the Vignette section in Lumetri much. There are no choices for blending modes, and the vignette is always centered. So, I roll my own vignettes using adjustment layers with masks and blending modes instead.
Visual Feedback in the Lumetri Color Panel
The wheels get filled when they’re adjusted, and their sliders get a blue color. This way, you always know what’s been adjusted and not.

Other sliders often have their default value at the center position, or at the far left. Again, this makes it easy to see what’s been adjusted.

Easily reset Sliders, Color Wheels and Curves
You can reset each slider, wheel, and curve in the Lumetri Color panel by double-clicking on them. This method doesn’t work in the Effect Controls panel, but in that panel, every parameter has its own Reset button.


Comments